This is for all bakers who are looking to work with a rye sourdough starter. Making your own rye flour based starter is the first step in the process of making rye sourdough breads. It’ll take you roughly five days to make the starter but you will be rewarded with wonderfully tasty natural rye bread loaves and will no longer be reliant on bought yeast.
The first bit of good news is that you will only have to do this initial work once. Once you have a starter, you will be able to keep it in your fridge for all future sourdough baking.
Secondly, the steps are really easy to follow and each step will only take a few minutes out of your day. So, without further ado, here’s how you make your own rye sourdough starter.
A note on water by Andrew Whitley in his book Do Sourdough: Slow Bread for Busy Lives:
“Tap water is treated with chlorine… which isn’t great for the bacteria that we want to nurture. There are two ways to reduce the chlorine threat: leave a jug of water standing overnight and most of the residual chlorine will evaporate; or use still spring water from a bottle. Once a starter is up and running, it will cope with water straight from the tap. Using a little spring water for the first few days will give your starter the best possible chances.
Rye Sourdough Starter Recipe
This is based on Andrew Whitley’s step-by-step guide in the best book on bread baking out there, Bread Matters. Use organic flour and spring water for best results.
Rye Sourdough Starter
Instructions
Day 1
- 25g wholemeal rye flour & 50g tepid water (35°C/95°F)
- Using a medium sized plastic bowl with a lid, mix the flour and water, put the lid on and keep at a warm temperature for 24 hours.
- There is no need to add anything else to your starter mixture as the wholemeal flour contains all the yeasts and lactobacilli needed for the fermentation process.
- The optimal temperature for fermenting rye sourdough is around the 30°C mark. Don’t worry if this is not the temperature in your room (it isn’t in my flat in Edinburgh!). The process will just take slightly longer.
Day 2
- 25g wholemeal rye flour & 50g tepid water (35°C/95°F)
- Add the above ingredients into the bowl which contains the 75g starter mixture from Day 1, cover and keep at a warm temperature for 24 hours.
Day 3
- 25g wholemeal rye flour & 50g tepid water (35°C/95°F)
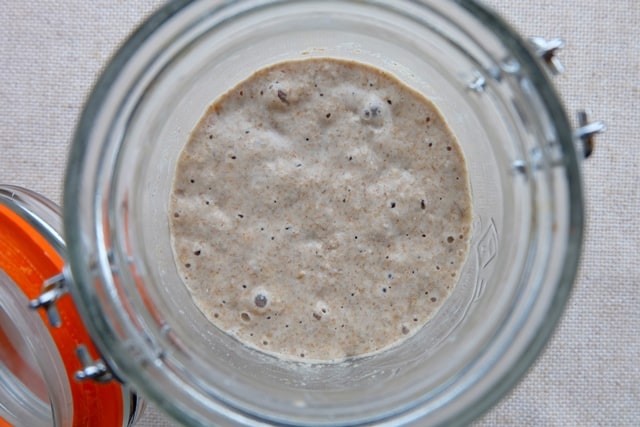
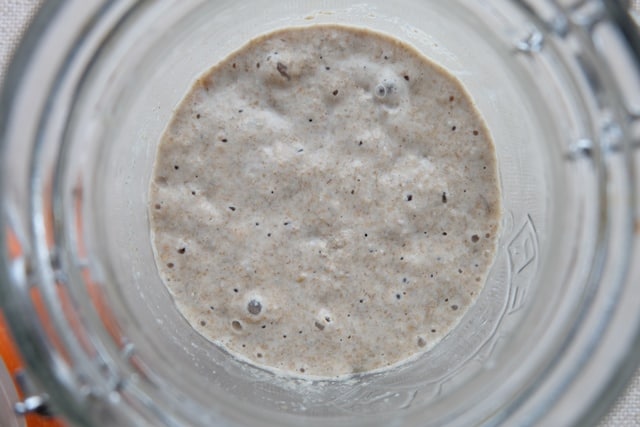
- Add the above ingredients into the bowl which now contains 150g starter mixture from Day 1 and 2, cover and keep at a warm temperature for 24 hours. At this point, you may already start to see signs of the starter fermenting (small bubbles).
Day 4
- 25g wholemeal rye flour & 50g tepid water (35°C/95°F)
- Add the above ingredients into the bowl which now contains 225g starter mixture from Day 1, 2 and 3, cover and keep at a warm temperature for 24 hours.
Day 5
- You should now have an active starter that has bubbled up overnight, slightly subsided again and smells fruity. You are the proud owner of a viable rye sourdough starter – the sourdough baking can begin!
If you have questions and are in need of a little sourdough troubleshooting, take a look at the Frequently Asked Questions below, visit The Bread She Bakes’ Sourdough Starter Q&A page or check out Andrew Whitley’s sourdough guide book Do Sourdough: Slow Bread for Busy Lives.
Rye Sourdough Starter FAQs
If there are no signs of life in your sourdough and it’s not bubbling or rising, even after you have kept it in a warm place, it probably just needs more time to get going. Give it another refreshment.
If it did show signs of life and then appears to have ‘died’, it may be that it has become too acidic. In this case, discard all but 130g of your starter and give it another refreshment.
If these steps don’t work, i.e. if you still don’t notice any life in the sourdough at all, then start again from the beginning with a fresh source of flour.
On day 3 of the sourdough process you may already see signs of frothing. If there is a layer of greyish liquid on top, don’t worry, just stir it in with the other ingredients.
On day 4, you should have a sourdough that has bubbled up and subsided.
A lively starter will give off a fruity-vinegary aroma. As Andrew Whitley puts it, it should smell “pleasantly fruity and slightly acidic with hints of beer and vinegar”.
As you go through the process, your sourdough starter will show signs of life: frothing, bubbling, rising. Also see the previous question on smell.
Once you have a viable starter, you need to attend to it only when you want to make bread.
The process is quite simple and always follows the below steps:
1. Refresh the sourdough starter (which has been kept in the fridge unless you bake almost daily). This is the moment when your starter comes to life again. You refresh sourdough starter by adding fresh flour and water and this will produce sufficient activity to ensure the refreshed sourdough starter can act as the raising agent in your final dough.
2. Add a portion of your sourdough starter to the production sourdough i.e. this is the stage when you combine your starter with the main dough ingredients to make the final dough.
3. Ensure you keep a portion of the starter back for your next back. Simply place it in a container with a tight fitting lid and store in the fridge until your next bake.