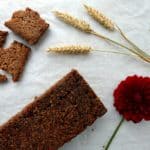
Pumpernickel Recipe
This recipe bakes one large loaf (tin size 33 cm long x 10 cm wide) and one very small loaf (tin size 17 cm long x 10 cm wide).
Ingredients
Pumpernickel Bread Ingredients
Preferment
- 50 g rye sourdough starter 350g fine to medium cracked rye, 350g water
Scalded Rye Berry Soaker
- 200 g rye berries 200g boiling water
Cracked Rye Soaker
- 150 g fine to medium cracked rye 150g water
Additional Dough Ingredients
- 550 g fine to medium cracked rye
- 150 g water
- 22 g salt
- 120 g maple syrup traditionally cane sugar syrup is used but I prefer maple syrup
- 1 tbsp rapeseed or sunflower oil for the tin
Instructions
How To Make Pumpernickel Bread
All the exact instructions to bake Pumpernickel can be found below. I’ve included sample timings for a weekend bake - starting Saturday, completing the bake on Monday morning and enjoying Pumpernickel bread on Tuesday for breakfast...
Day 1 (Saturday noon/early afternoon)
- Prepare the preferment. Combine in a bowl, cover and leave to ripen for 16 - 24 hours.
- Prepare the scalded rye. Pour the boiling water over the rye grains and leave overnight.
- Prepare the rye soaker. Combine in a bowl, cover and leave overnight.
Day 2 (Sunday)
- 11.30am - Add one litre of water to the scalded rye soaker, bring to a boil and simmer for approx. 1 hour until soft.
- 12.30pm - Strain the rye and discard any remaining water. Set aside to cool.
- 1pm - In a large bowl combine 700g of sourdough (the rest goes back into the fridge for your next bake), the cracked rye soaker, the cooked and cooled rye berries, the 550g extra cracked rye, the water (150g), salt (22g), maple syrup (120g) and mix until the dough comes together well. Mix for a few minutes (I just do this with my hands). Once this is done, cover the bowl and leave to rest for 30 minutes.
Note: The dough should not be wet. It should stick together well and not fall apart. It should peel off the side of the bowl easily and stick on a spoon when held up. - 1.45pm - Oil a large and a small loaf tin (I use a silicone brush to do this), then place the dough into the baking tins. Again, just use your hands to do this and even out the dough surface across the tin. Fill the tins only half full. Cover the tins - if you are using Pullman forms, use the Pullman tin cover, otherwise use a polythene bag to ensure the dough doesn't dry out.
- 2pm - Leave to prove for 3 hours (depends on room temperature, so do keep an eye on the dough during this time). The dough will have risen, probably not quite to the top of the tin, but it should have visibly risen.
- 4.30pm - Preheat the oven to 150°C.
- 5pm - Brush the top of the dough with a little water. Fully wrap the baking tins with two tight-fitting layers of tin foil to avoid the steam escaping and the dough drying out during the long baking process. Note, that I cover even the Pullman tin in these additional layers. Place the wrapped tins at the bottom shelf of the oven and bake for approximately 14 hours (best done overnight).
- 6pm - Turn down the temperature to 120°C.
Day 3 (Monday morning)
- 7am - After baking, turn off the oven and leave the baking tin in the cooling oven for another hour.
- 8am - Take the loaf out of the baking tins and wrap in a kitchen towel for another 24 hours.
Day 4 (Tuesday morning)
- Cut into thin slices and enjoy with butter and jam or smoked fish for a hearty breakfast!